Summary
When I started the entire van build process I knew that I wanted the van to feel like a home. If you’ve been following along you will know that I didn’t make many compromises in the build process.
Speaking from experience
Many people who plan to convert a van into an RV only plan on using the vehicle for shorter camping trips and weekend warrior expeditions, so for these people it’s much easier to get away with smaller and less fully equipped kitchens.
Living in the van is already a pretty big change for me and one of the things I wanted to focus on was eating healthier and providing myself with a more balanced diet.
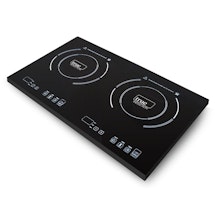
By putting in a nice two burner induction cooktop and allocating enough storage for proper cookware it has allowed me to cook well balanced meals in the van. Cooking for me was something I always enjoyed but living at home I found it hard to motivate myself to cook for one person. Since living in this space I have really enjoyed cooking again and look forward to making meals on the road.


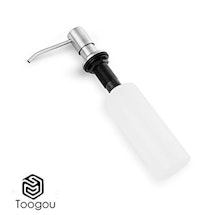
This isn’t the exact one that I bought for my van but close enough. I lucked out and found a white one on sale at Home Depot for $5 and just painted it black. When I put the van together and told my Dad I wanted to drill a hole into the nice countertop he thought it was a bad idea, but now that I have it in the van it’s become one of my favorite things because I use it everyday multiple times a day….mines just filled with dish soap.
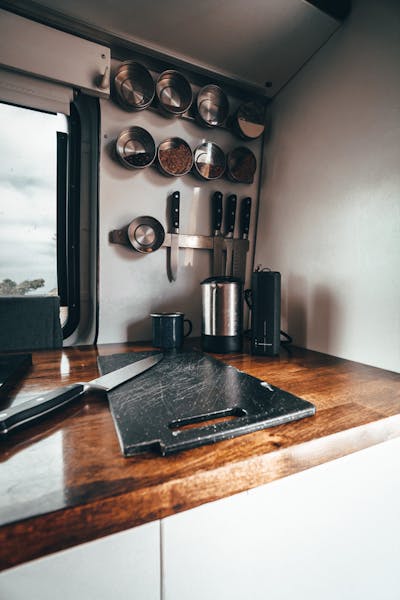
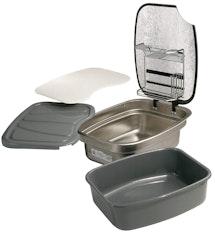
The sink I selected for the van was the SpinFLo Kitchen center. The sink has been great in the van and I really like having the lid option. I haven't used all the other accessories such as the drain pan, cutting board and wash tub, mainly because with the sink rack on the lid you can’t close the lid with those items inside.
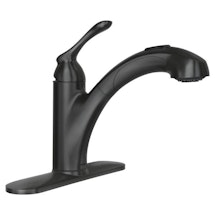
When I selected the faucet for my sink I wanted to get a black faucet (just because I thought it looked cool) and I wanted one that had a pull out sprayer. This faucet met both my requirements and was available at a reasonable price. So far it's been a good faucet and hasn’t had any major issues.
Having the paper towel holder above the sink is a handy little feature in the van but just an FYI when driving down the highway with the front windows open the paper towel roll on occasion has found the need to completely unwind itself.

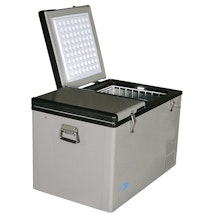
For my fridge I went with the Whynter FM-62DZ fridge. This particular fridge is more affordable than some of the other units and so far it has worked really well. A couple things to keep in mind is that this fridge does consume more power than the Dometic, ARB or Engel units but so far it hasn’t been a huge issue for me, but just keep this in mind when you are planning your solar system and power consumption. This particular fridge pulls around 6-7amps when the compressor is on full blast. One thing about choosing a fridge is I highly recommend getting a top loading fridge, you can cram way more stuff inside as compared to an upright side loading fridge and this makes bringing enough food for long trips much easier.
I opted to go with a dual burner induction cooktop in the van. My build has a large solar array and decent battery bank which makes powering this cooktop not an issue. The induction cooktop is really handy to have in the van and super easy to keep clean. If you are considering going the induction route one thing to keep in mind is that 90% of the time I only use 1 burner so if you are looking to save some space and money you could likely go with the single burner option. When I was putting together the van one thing that I wanted to accomplish was to have a single fuel source. So this is why I didn’t go with a propane cooktop and the same reason I installed an Espar Heater in the van.
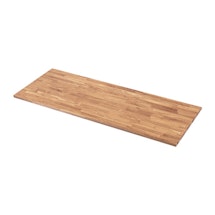
The counter that I used in my van was a wooden oak butcher block counter from Ikea. The Ikea countertops is a good quality and is solid wood all the way through. I was able to purchase a single countertop section from Ikea and cut it in half to use on either side of the van. When I was looking at the different counters from Ikea none of them matched the dark wood stain I used on the upper cabinets very well, so I sanded down the Ikea counter and stained it using the same stain from the upper cabinets then sealed everything with 6 coats of a food safe sealant.
The Springfield Gas Powered Table Pedestal will allow you to position your RV table at several different heights.

Since I've lived in the van for an extended period of time now, latches have been something that I've played around with a lot. Originally, I installed magnetic latches, which look great as they are hidden. They also worked great for the most part, but I found that if you overload the drawer and find yourself off-roading, they can open up on you. For that reason, I've changed all my latches over to slam latches.

Install Process
The Kitchen and Food Storage is a very important part of the van. Having the ability to store food for a couple of weeks and cook all meals in the van allows me the ability to be off-grid longer and encourages better meal prep and less dining out.
Storage and kitchen walkthrough
Here is a quick walkthrough of all the kitchen items and food storage that I have in the van.

Under the sink is where my hot water and water pump are located. I also store all of my dishcloths under here.

Garbage cabinet
Beside my hot water tank, I have another large cabinet that I keep the garbage bin and various cleaning supplies in. The slide-out garbage can is from Ikea and is pretty convenient to have in the van.
Also in this cabinet are my 2 water filters and the charge controller for the solar system.

Washroom/medicine cabinet
Above the garbage bin, I have my toiletries/medicine cabinet drawer.

Drawer Storage
Across from the sink area in the van is where I have most of the Kitchen related items. On the right-hand side, I have three drawers. The bottom two drawers are filled with cooking items and the top at this point doesn’t have anything in it.
Kitchen utensil storage
When you start planning out your van build you’re going to try and think of every possible scenario. You’ll learn rather quickly that it’s nearly impossible and also unnecessary. I probably only use 10% of the kitchen utensils I have, so keep that in mind when planning your build and what you will realistically need.
Spice / Tea Rack / Knives
Since moving into the van I’ve found that having coffee and tea has become more and more a part of my daily routine. It’s fun when traveling around to test out and visit new local coffee shops. From my personal experience, the types of people that you are able to meet in these locations can provide great insight into the type of city you’re in.

Fridge
I spent quite a bit of time debating on the style of fridge I should go for. The fridge that I went with is a top-loading dual-zone Whynter fridge. For the longest time, I had contemplated going with a front-loading style fridge mainly because of the way it looked, but after going with the top-loading fridge I am glad I chose this option over the other choices.
Having the top loader allows me to cram a ton of food into the fridge making it possible for me to go a little over 2 weeks without needing to visit the grocery store. I’ll be the first to admit that every time you open the fridge it is a bit of a puzzle to get everything back together but in my mind, it’s worth it.
The other feature of this van that I utilize all the time are the dual zones and having the smaller half function as a freezer.

Upper Food Storage
Outside of the fridge, I have dedicated 2 upper cabinets to food storage, and sometimes after a fresh shopping trip, the storage creeps into a third cabinet. Inside I have tons of storage so even though sometimes getting everything to fit is a bit of a puzzle I seem to be able to make it work every time.
Sliding table
A lot of people ask me about the dining table I made. As you can see in the video above, my table has the ability to move in 4 different directions. When setting my van with its current layout I needed a way to allow myself to get to the back of the van and use the toilet and shower. Most people that use this standard pedestal setup have no way of easily getting around the table.
For this project, my Dad helped me rig up a system using two standard drawer sliders placed in opposite directions which allows the table to move forward/backward and side to side.
This system has worked really well for me so far. Another option that I see many people going with is to use the Lagun Table Mount and after seeing them in person it is also an excellent option if you don’t need it to go up down and down with a hydraulic assist.


Latches and hinges
As you will see throughout various pictures and videos of my van, I used a ton of different hinges and locks to keep everything closed. After much trial and error, the system that I found worked the best was to use marine slam latches.
These latches lock great and keep everything closed while driving. After some trial and error, I more or less installed these latches everywhere in the van except the upper cabinets.


Pro Tips
Magnetic switches
One added touch that some may not find necessary are the lights in the side benches and wardrobe cabinet that are triggered with a small magnetic switch. As soon as I open these cabinets the LED lights turn on and make things are whole lot easier in the dark.

Butterfly latches
Some people might not consider how their drawers could open as they drive. Well let me tell you from experience that as soon as you get them all loaded up with everything, the added weight makes them fly open on almost every corner. In order to keep the drawers and doors closed I used a combination of different latches in the van
-
Magnetic Latches
On all of the upper cabinets I used 20lb magnets

-
Butterfly Latches
On the shower door, fridge cabinet and wardrobe drawers I used butterfly latches.

-
Magnetic Baby Latches
On the uppers drawers I installed magnetic baby latches that work great and the benefit of them is you don’t have to remember to latch them as the automatically latch when you close the drawer.

-
Marine Pull Latch
On the large wardrobe doors I used some white marine latches to keep these doors closed. These doors are quite big and heavy and before I had these latches installed I was driving down the highway and took and turn that caused the door closest to the front to open so fast to broke off the hinges and dropped to the floor putting a massive gouge in my counter top. With these new latches that hasn’t been a problem at all.

Loading up the fridge
The more food you keep in the fridge the less energy you’re going to waste trying to keep the fridge cold. So try and keep as much food as you can in the fridge and you will notice that your fridge spends less time running as the items within the fridge help retain the lower temperatures.
Freezing water bottle
When spending time in warm climates your fresh water source will be as warm as the air around you and at times it’s just not going to quench your thirst. For this reason I always keep a half frozen water jug in the freezer so I can fill it up with the air temperature water from the fresh water tank and enjoy some cold water.
Fridge wire size / grounding
If you look back the electrical section of this build guide you will see that I used 14/2 in wall speaker wire for all my 12v wiring…. Well after using the fridge for some time it turns out that the fridge pulls more amps than I was expecting and although the 14/2 wire would run the fridge I was experiencing almost 15% voltage drop over the roughly 12ft or wire.
So what was happening is that the fridge would work fine when the batteries were topped up but as the batteries would drain down to 11.5 volts the fridge would draw down to 10v and trigger the low voltage shut off on the fridge which would turn the fridge off….
So when planning your van build I would suggest installing the fridge on a separate circuit and using 10 AWG wire for this and you won’t have any problems.
Storing dry food
A lot of the items that you buy in the grocery store come in large boxes and bags. After a big shop I remove all items I can such as crackers from the box and just place the bags in the cabinet.
Typically I even go one step further and open the bags letting all the air out and use a chip clip to keep the bags closed. By doing this I find I am able to really maximize all of the storage inside the van and can store way more food for longer trips.
Gallery
VIEW ALL


Author
Scott Adamson
Vanlife aficionado with his rescue dog Ellie. We travel around North America in search of good times and fresh coffee.